import de.tototec.sbuild._
import de.tototec.sbuild.TargetRefs._

class SBuild(implicit project: Project) {

  SchemeHandler("http", new HttpSchemeHandler())
  SchemeHandler("mvn", new MvnSchemeHandler())
  SchemeHandler("zip", new ZipSchemeHandler())

  val dependencies =
    "libs/a-local-jar.jar" ~
    "http://cmdoption.tototec.de/cmdoption/attachments/download/3/de.tototec.cmdoption-0.1.0.jar" ~
    "mvn:org.slf4j:slf4j-api:1.7.0" ~
    "zip:file=junit4.10/junit-4.10.jar;archive=http://cloud.github.com/downloads/KentBeck/junit/junit4.10.zip"

  ExportDependencies("eclipse.classpath", dependencies)

}Managing Eclipse Build Path Entries with SBuild
23 October 2012 by Tobias Roeser
Managing the Classpath-Entries of a Java project is not an trivial task. The simplest way is, to put your JARs in the project directory (or a sub directory) and add them to the build path. Of couse this has many limitiations. If you work in a team, you need to add them to you version control system, which is no good idea. If you have many projects, you end up having many duplicated JAR in each project. What was the version of that JAR again? Where does it came from and where to go to get an updated version?
There are better alternatives! If you are a Maven user, you can install one of the two Maven Eclipse integration plugins (m2e, IAM) available, but of course, both require, that you first setup your Project to build properly with Maven, not an easy task. Many other solutions also integrate into Eclipse, some do better, others even worse…
The Problem
Managing the Classpath-Entries of a Java project is not an trivial task. The simplest way is, to put your JARs in the project directory (or a sub directory) and add them to the build path. Of couse this has many limitiations. If you work in a team, you need to add them to you version control system, which is no good idea. If you have many projects, you end up having many duplicated JAR in each project. What was the version of that JAR again? Where does it came from and where to go to get an updated version?
There are better alternatives! If you are a Maven user, you can install one of the two Maven Eclipse integration plugins ("m2e":http://eclipse.org/m2e/, "IAM":http://wiki.eclipse.org/IAM) available, but of course, both require, that you first setup your Project to build properly with Maven, not an easy task. Many other solutions also integrate into Eclipse, some do better, others even worse…
SBuild to the rescue
SBuild is a very new buildsystem for Java projects, but it is already stable and can handle large multi-projects. To manage your project build path with SBuild, you are not required to convert you whole project tree to SBuild (as, e.g. Maven does). SBuild is a very flexible build tool which lets you do with it, whatever you want, and does not enforce you to implement a set of specific conventions.
In the rest of this article, I will show you, how you can manage your Eclipse project build path with SBuild and the SBuild Eclipse Plugin. This article is not about building your project with SBuild.
To install SBuild, download the SBuild Distribution, e.g. the sbuild-0.1.4-dist.zip from
the SBuild download homepage and unpack it into a local directory.
If you are under Windows, you need to add an environment variable SBUILD_HOME pointing to that local directory (containing the content of the ZIP file).
For further instructions, how to install SBuild, read page Installation.
Describe your dependencies
We start with describing our dependencies. SBuild provides various options to retrieve your dependencies, out of the box. Of course, you can reference local JARs, but you can also use Maven repositories. In fact, you can access any resource available via HTTP protocol and can even reference resources located inside a ZIP file, which itself is located on the internet.
All your dependencies are declared in SBuilds build file, which by default has the name @SBuild.scala@. Here is an example:
Above, you see a minimal SBuild build file with four declared dependencies. Each of them uses a different name scheme.
The first one (line 11) uses the "file" scheme, which is the default and therefore the prefix "file:" is (and can) omitted.
The second one (line 12) uses the "http" scheme, which is registered in line 6, and used the HTTP protocol to download dependencies. (The HttpSchemeHandler is used.)
The third dependency (line 13) used the "mvn" scheme, registered in line 7, which allows you to access resources in Maven repositories through the typical Group:Artifact:Version coordinates.
Per default, the central Maven repository is used, but you can configure the MvnSchemeHandler further, to e.g. add more repositories.
The fourth dependency (line 14) is a file inside a ZIP file and uses the "zip" scheme, registered in line 8, to access it.
The file=<name> part describes the file inside ZIP file.
The archive=<archive> part describes the location of the ZIP file, which may be any of the supported schemes, here the "http" scheme was used. (The ZipSchemeHandler is used.)
Finally, you want to access your dependencies from Eclipse, so we export them in line 16 and thus make it accessible from the SBuild Eclipse Plugin.
Each of the SchemeHandler registered above can be further customized. The name you give to your scheme is up to you, as long it is unique and is not "file" or "phony", which are the built-in schemes of SBuild. You can even register the same SchemeHandler under different scheme names, e.g. to have two different configurations. Here is an example:
  // Maven artifacts with OSGi bundles maintained by Springsource
  SchemeHandler("mvn-osgi", new MvnSchemeHandler(repos =
    Seq("http://repository.springsource.com/maven/bundles/release", "http://repository.springsource.com/maven/bundles/external")))

  val osgiDependencies = "mvn-osgi:org.slf4j:com.springsource.slf4j.api:1.6.1"
And bring them into Eclipse
Update 2012-11-01: With the current version 0.2.0 there is also an Update site to install SBuild Eclipse Plugin. In this case, you can ignore the next parapraph.
If you do not have done it before, now is the time to install the SBuild Eclipse Plugin.
Download the plugin JAR de.tototec.sbuild.eclipse.plugin-0.1.4.jar from
the SBuild download homepage and place it into the "dropins" folder of your Eclipse installation.
After that you need to (re)start your Eclipse.
To function properly, you need to tell your Eclipse the location of the SBuild installation.
Open the Eclipse Preferences → Java → Build Path → Classpath Variables and add the variable SBUILD_HOME, pointing to the installation directory of SBuild.
For further instructions read the installation instructions for the SBuild Eclipse Plugin.

Figure 1. Adding a new Classpath Variable SBUILD_HOME
Open you Project Properties dialog and select the "Java Build Path" settings page. Open the third tab "Libraries" on the left, and click "Add Library…". Select "SBuild Libraries". You can leave all configuration settings on their defaults, for now, an click "Finish", to complete. Now, the SBuild Eclipse Plugin will first read you project and retrieves all dependencies. This might take a while.
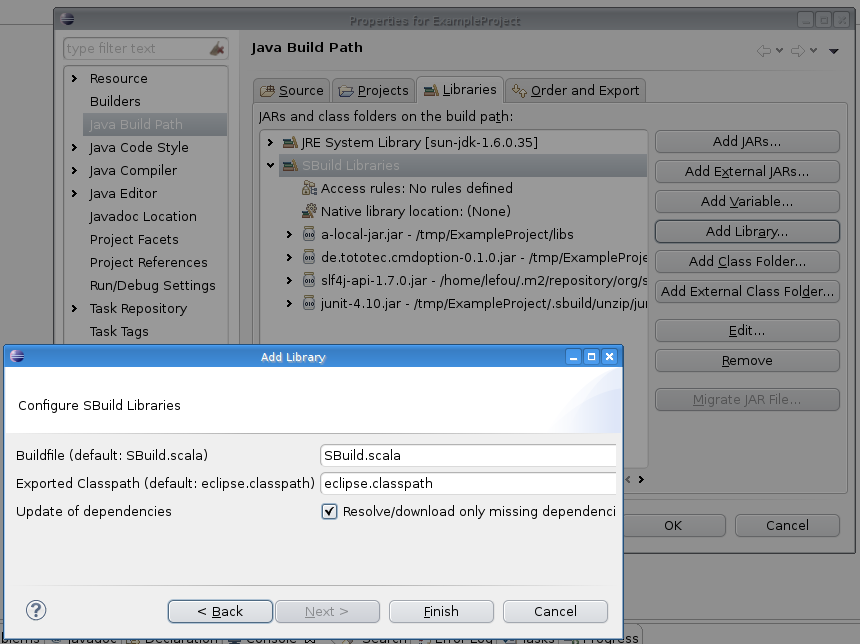
Figure 2. Add the SBuild Libraries Classpath Container to the project
After you added the "SBuild Libraries" classpath container to your Java project, you should see a new entry "SBuild Libraries" in your Package Explorer.
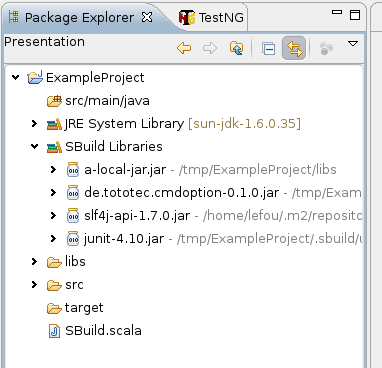
Figure 3. The expanded SBuild Libraries in the Package Explorer
Congratulations! You just enabled yourself an powerful way to manage your dependencies with SBuild. You have now a very compact configuration which is also the documentation of your projects dependencies. You not only know your project dependencies, you now also know and documented where they come from. You should add this configuration to your version control system and any team mate should be able to reproduce the same build path as you have.
Further readings and information
I hope, I could give you a taste of the posibilities and flexiblity of SBuild. The Eclipse Plugin can do more, e.g. workspace resolution. I invite you to test SBuild and the SBuild Eclipse Plugin.
Here is the complete example Project: ExampleProject.zip
You can find more information on the SBuild homepage.
Update 2012-11-01: Added Link to Eclipse Update Site.
Update 2012-11-03: Added ZIP with ExampleProject.
Update 2012-11-07: Removed notice about a refresh bug, that is fixed meanwhile.
Recent News
December 2014
May 2014
April 2014
March 2014
- 20 - SBuild 0.7.4 released
- 18 - SBuild 0.7.3 released
- 06 - SBuild 0.7.2 released
February 2014
December 2013
- 20 - SBuild 0.7.1 released
- 20 - The Plugin System of SBuild 0.7.1
- 06 - Jenkins Plugin for SBuild available
- 06 - SBuild 0.7.0 released
- 06 - The Plugin System of SBuild 0.7.0
- 03 - All SBuild repositories are now hosted on GitHub
November 2013
September 2013
July 2013
April 2013
March 2013
February 2013
January 2013
November 2012
October 2012
- 31 - SBuild Eclipse Plugin 0.2.0
- 29 - SBuild Eclipse Plugin 0.2.0 release comming soon
- 23 - Managing Eclipse Build Path Entries with SBuild